
I have been experimenting with a new (for me) painting technique called an acrylic pour. I mentioned it briefly in an earlier blog. This blog explores the outcome!
Acrylic Pour and More
What is an Acrylic Pour?
A new addiction has broken out among many of my artist friends and that is for the painting technique known as an acrylic pour. I am not sure when this technique first came to my attention but I thought it looks like fun. Put simply, paint is poured onto a canvas or other surface rather than being applied with a brush. Of course, as with most things there is more to it than that. Mixing the paint to enable the pour is an art in itself and there are various things to add to it before it is ready to use. Not to mention preparing the surface beforehand to accept the pour.
Just to give you an idea what I am talking about, this short video just shows you the basics of an acrylic pour.
My Acrylic Pour Experiment

I wanted to play and try the idea of an acrylic pour but I wanted to use just the materials I had to hand in my studio. A pack of four small canvases (eight inch square a approximately, 20cm) were sitting on the shelf and lots of acrylic paint. In the end I used all four canvases over three separate days (two canvases on the final day). Each time I tried a different technique.
The collage shows the four canvases I created using different acrylic pour techniques each of which I explore below in more detail. These individual canvases are available for sale locally.
In the end I was so pleased with how they turned out I scanned them in and then applied a digital texture. This enabled me to offer larger prints and use them on different products for sale in my RedBubble store.
Dirty Pour
The first thing I tried was a dirty pour which I thought was the simplest to start me off. That is the technique demonstrated in the video above. I didn’t want to worry too much about the idea of ‘cells’ which is when silicone is added to the paint. The hope was I would pour the paint without getting it all over me or my studio! I did cover the table and floor with plastic just in case!
I can’t tell you how nerve wracking and exciting it was to have the cup turned upside down on the canvas ready to lift. But I managed to do it without making a mess. I had used quite a bit of paint as I wasn’t sure how much I would need. This was a mistake as quite a lot was wasted and ran off the edge of the canvas. I put a support under the middle of the canvas to stop it sagging during the process. Then that was placed on a wire rack which allowed the excess paint to drain down into a tray underneath.
I was quite pleased with the outcome as a first try, though my Mum can see a warped Santa in the corner! (Bet you can too now). I called this ‘Il Marmo Acrylico‘ meaning acrylic marble as it reminded me of a fancy marble kitchen surface.
Swipe Technique
The next day I created another pour that started with the same technique of dirty pour but this time I used a swipe technique, dragging something across the surface. When I had finished I liked it but when I looked at it the next morning it reminded me of some dreadful 70s wallpaper! So I dragged it again, this time creating ridges in the semi-dry paint. At that point it made me think of a cavern underground so I decided to work with that.
I mixed some coloured glitter with some glue (clear drying glue) and then applied that to the canvas to suggest stalagtites and stalagmites. I have to say it was much more fun than the acrylic pour had been and I was really pleased with the result, ‘La Caverna Magica‘, the magical cave.
Puddle Pour

Simple Puddle Pour
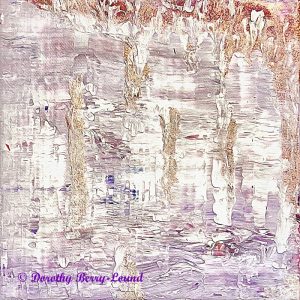
After a few days I thought it would be fun to use the final two small canvases and use the same colours but slightly different techniques. I also wanted to explore ‘negative space’ – areas of the canvas without paint.
I prepared the two canvases by pouring just white paint and ensuring the canvases were completely covered. Three colours were selected to work with. Then on the first canvas I put three puddles of paint. This involved pouring one colour and then another on top so each pile looked like three coloured circles with rings. The bottom circle was the largest, smallest at the top. I then ran my finger through the puddles and tilted the canvas slightly, allowing the paint to do what it wanted.
I ended up with something quite dense and brightly coloured but balanced out by the negative space that I call ‘Il Colore Sforzato‘ or striven colours.
Puddle Pour and Smash

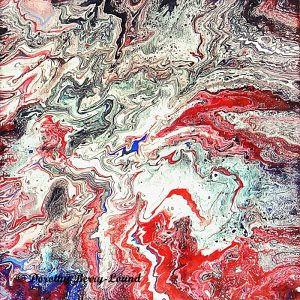
By this point I had completely given up on trying to create cells and was just interested in what I could do technique-wise. I created a second puddle pour in exactly the same way as I did for ‘Il Colore Sforzato’. But this time instead of running my finger through the colours I literally hit the piles of paint several times with the bottom of a jar (I didn’t have a mallet to hand). This was quite satisfying to do, not as messy as it sounds, and I am really pleased with the result. I deliberately allowed the paint to ridge in places to add extra texture. And I don’t know about you but ‘Nei Sogni dei Pesce‘, the dreams of fish, looks like a shoal of exotic fish to me!
Conclusion on Acrylic Pour as a Technique
I loved playing with acrylic pour as a technique and learnt a great deal that I can apply to my artistic practice.
All of the images in my blog today are available on a variety of wonderful products at my RedBubble store. Just click on one of the four separate paintings to be taken to the product page and see what is available.
Before you go

My name is Dorothy Berry-Lound an artist and writer. You can find out more about my art and writing at https://dorothyberryloundart.com.
You can follow me on Facebook.
Thank you for reading!
Very nice pours Dorothy – I certainly do like the ‘dreams of fish’. Excellent blog as usual.
Yes I like that one, I was able to use what I learnt from the preceding three pours. It has been an interesting experiment.